
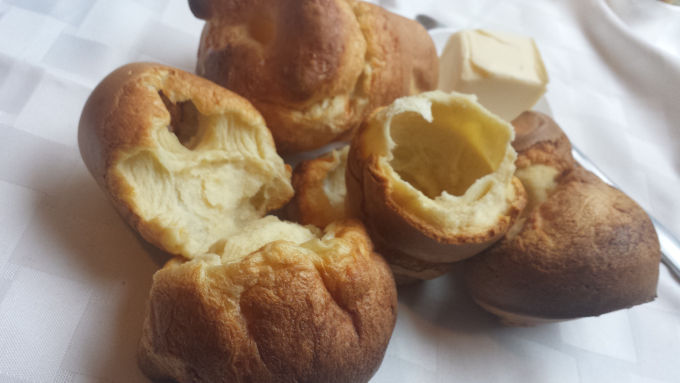
 Ahh the classic popover. I don’t know if classic is the right word to use, but I do know these little guys go great with almost anything you throw their way. In other words, they are super versatile and simple to make. But as always, there’s a catch – they can be quite finicky. It’s important to stick to the recipe as close as possible here or you might end up with some useless burnt paperweights. Not that anyone asked, but there is a bunch of science going on here and I love science. To be fair though, science happens anytime something gets cooked. Sometimes however, it’s just more exciting when particular dishes are being prepared, and this happens to be one of them for me. Let’s go back to their versatility for a minute. They make delicious edible bowls that you can fill with all kinds of tasty things such as your favorite soups or stews. They also work great for holding sauces or gravies which can be poured directly from the popover just like a miniature gravy boat. These alone are two great reasons why learning to make these puffy treats might just be worth your time. But if that isn’t enough, I have a couple more ideas for you. You can stuff them with slices of your favorite fruit, sprinkle some powdered sugar on top, and then finish it all off with a dash of whipped cream. You might want to use a little syrup, but I think you get the idea. If that doesn’t appeal to your taste, you could always spread a little butter or even some coconut oil directly on a fresh from the oven popover and be just as happy.
Now to address the finicky nature of the popover. They only consist of 5 ingredients but there will be some important things going on as the batter is cooked. Popover batter has a high liquid to solid ratio and this combination is perfect for creating the steam that’s necessary for producing the large air pocket in the middle. This is also what forces the popover to rise so dramatically. But let’s face it, I’m no scientist and I’m pretty sure no one here wants to listen to me pretend to be some sort of chemist. I’m not, I just pretend I am, mostly because I really wish I was one. So anyway let’s just move on. The tall cups in a popover pan help the batter expand upward as it cooks to give it that signature look you’ve come to expect. And I’ll probably say this more than once, but make sure that after you take the popovers out of the oven, you pierce the tops of each one with a skewer or a small knife to let the trapped steam escape. If you don’t, they will get mushy inside.

This recipe calls for one cup of AP flour, otherwise known as all purpose flour. It contains the right amount of protein to give us the exact texture we are looking for. I will assume most of you already know this, but high protein flour is used in baking most breads as it provides the strength and the chewiness you would expect. I picture a nice warm baguette straight from the oven with its chewy outer layer and its soft warm…
I digress. Cake or pastry flour contains less protein, somewhere around 7-9%, giving the end product a light and fluffy texture just like you see with cake. For the popovers, we want something in between. They have a good mixture of airiness to them as well as a decent amount of strength. But what’s even more important than that, they downright taste excellent. You will also want to make sure you take out a couple eggs ahead of time so they can warm up to room temperature before adding them to the food processor or blender, or whatever you will be using to mix the batter. The same goes for the milk. I would say the same for the 1 teaspoon of butter, but it needs to be heated and then cooled down (not so much that it turns solid again) before being added to the mixture. Don’t forget to use some additional butter to grease the sides of the popover pan. Try using a small rubber spatula for this unless you want to scrape the metal on the side by using a butter knife.
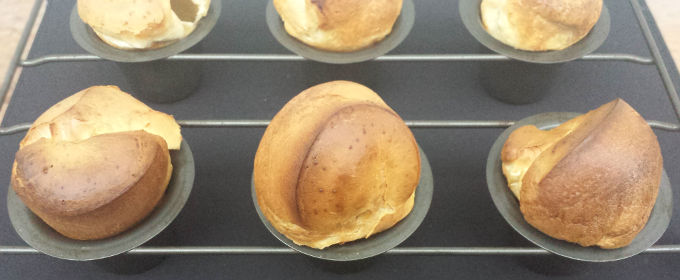
This next step is important. Before doing anything else, you need to preheat the oven to 400° F. After the oven has reached the correct temperature, toss all the ingredients into your food processor and blend away. Well actually only about 30 seconds or so. Really, it just needs to be blended thoroughly but not beaten to death. And now it’s ready to be poured into the popover pan. Hold up one second though, because it is important that you use the correct tools for the job, meaning if you don’t have a popover pan you need to go out and purchase one. Muffin tins aren’t going to cut it.
Don’t worry about letting the batter sit either, because now is the best time to add it to the pan. Many people might tell you different but there is no need to listen to their advice. Fill each cup between 1/3 and 1/2 full, making sure not to fill it more than 1/2. The recipe below should be the perfect amount for a popover pan with 6 average sized cups. This is exactly how I make my popovers and it has worked absolutely perfect for me every time. I realize oven temperatures may very so if your popovers turn out burnt or flat it could be that they weren’t baked at the correct temperature. Oh and one last thing, once they begin baking, the oven door should remain closed the whole time. No peaking as this could result in a loss of heat that will make the popovers flat. So if you have an oven light and a window to see how the popovers are doing you should be set. If not, well just cross your fingers and hope everything turns out right. Good luck with them and let me know how yours turned out in the comment section below.
Popovers
By: Semiserious Chefs
Serves: varies
Ingredients:
- 1 tablespoon unsalted butter + 1 teaspoon for the pan
- 1 cup all purpose flour
- 2 eggs (at room temperature)
- 1 cup milk (at room temperature)
- 1 teaspoon salt
Directions:
- Set eggs and the milk on the counter to warm up to room temperature. In a small saucepan melt 1 tablespoon of unsalted butter and then let cool.
- Preheat oven to 400° F.
- With a small spatula grease the inside of each cup of the popover with butter. It doesn’t need to be fancy, so 1 teaspoon of butter should be just fine.
- In a food processor combine the melted butter, flour, eggs, milk and salt. Blend for roughly 30 seconds until smooth. All ingredients should be thoroughly mixed.
- Pour batter into the popover pan filling each cup between 1/3 and 1/2.
- Place the pan on the middle rack of the oven and bake for 35 minutes.
- After they are done baking, pierce the top of each with a skewer or a small knife to let out any trapped steam.
Post a comment