
With my first attempt at making sourdough bread producing less than stellar results, I’m fairly confident this time around I will achieve better results. As one commenter stated, I need to let the dough rise for much longer than I previously had. And just looking at the starter today, I could see bubbles forming on the top. To me, that’s good news.
Since I’m somewhat of an avid pizza dough enthusiast, I liked what I was seeing. Let me give you a little backstory though before I continue. My first attempt at creating a delicious loaf of warm chewy sourdough bread (as you may have read) fell flat on its face partly because I couldn’t get it to cook all the way through, but mostly because it was dense and didn’t have any sourdough flavor at all. Basically it was just a dense loaf of under cooked white bread.
This time though, I changed some things up. The most important factor being that I completely forgot I had sourdough starter in the refrigerator. I honestly don’t remember if I’ve fed my starter at all since my first attempt. That post was dated June 27th. That means it’s quite possible that it’s been more than 2 months since I fed it.
I don’t know if that’s good or bad or normal, but when I was clearing out the fridge yesterday, I noticed the bowl sitting on the lower shelf. I thought to myself, well this could be bad. But you know what? I opened the lid and it looked awesome!
One of the first things I noticed was how much liquid was on top. It seemed like an abnormally large amount. I hadn’t remembered there being that much during previous feedings. So, to get the starter ready for a picture, I removed the liquid (hooch) by pouring into a separate bowl.
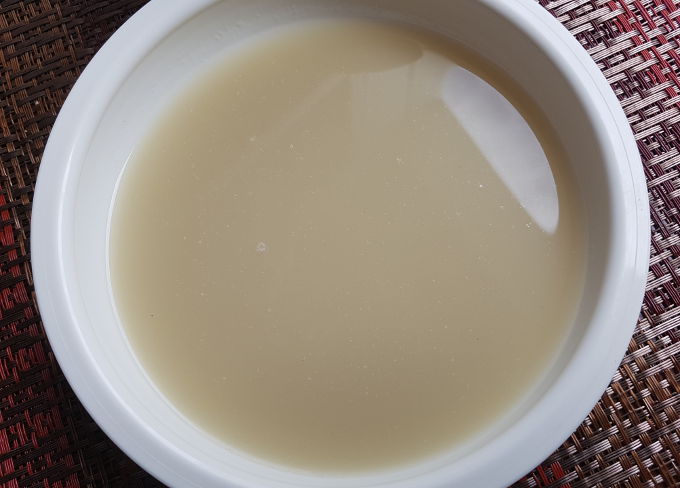
This is what I poured off the top of the starter. Good stuff, but I nearly spilled it while walking past the mat it was sitting on. That would have been a disastrous waste of two months let me tell you.
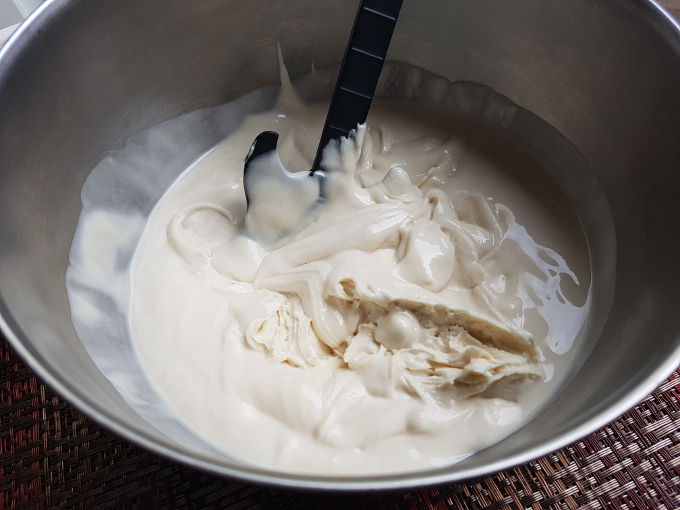
Of course Vanessa and I had to taste it for scientific purposes. It didn’t disappoint, that’s for sure. It seems that some people throw the hooch away and only work with the dough itself, but I don’t do that. I simply mix it all back together because I feel that’s where most of the flavor comes from. But again, I’m no pro so I might be wrong here.
Whatever the case, I feel that this batch of starter is doing very well and I’m a lot more confident that I’ll end up with a much better product than I did last time. I’m wondering if the most critical steps to making a good starter happen at the beginning. I’m just guessing here, but maybe after feeding it regularly for a month or two, it sort of establishes itself, and is much more capable of going without regular feedings for extended periods.
It’s just a theory on my part, and it wouldn’t surprise me in the least if I’m completely wrong. But either way, I feel that I can now just leave my starter in the refrigerator to do its thing without constantly worrying when I last fed it. Maybe I’ll start doing monthly feedings and see how that goes.
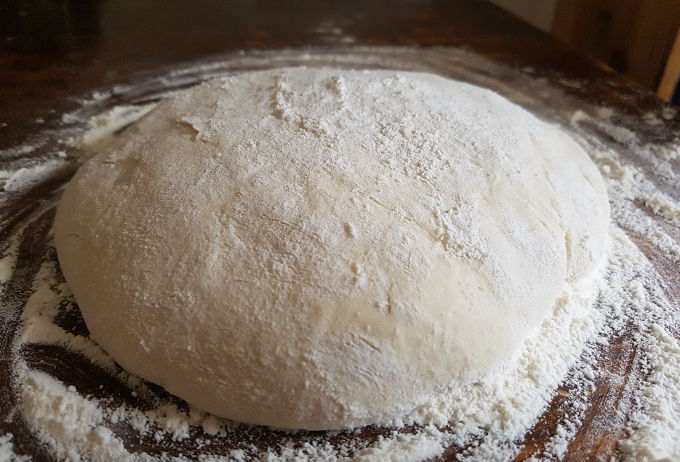
You might notice how thick the starter looks in the picture below. I’m not quite sure why, but it probably has to do with how much liquid was resting on the top. I get the impression that a good portion of the liquid separated from the flour leaving a big sticky mess. It was just something I found interesting which I hadn’t encountered before. When I returned the hooch to the starter, it quickly turned back into a pancake like consistency.
Notice my handy dandy guitar spatula. I mentioned it in my post: Sourdough Bread – First Attempt. It seems that it’s quickly becoming my default sourdough spatula.
As of right now, my sourdough is on its third rise. I plan on letting the dough rise for 2 hours this time and so far it’s been rising for an hour and a half. To be honest, it doesn’t look much bigger than it did to begin with. I think I might have to play this one by ear, but most likely I’ll use it regardless of how much it’s risen. After all, there’s always next time right?
The whole point of these posts is to share what I’ve learned about making sourdough bread. And if there’s one thing I’ve learned this time, it’s that the starter turned out well even though I hadn’t fed it for a long time. Hopefully, one day I will get to the point where I understand the whole process and know what I should or shouldn’t do. Whether or not the sourdough turns out well this time, isn’t very important. At least I moved forward and not backwards. That’s all that matters.
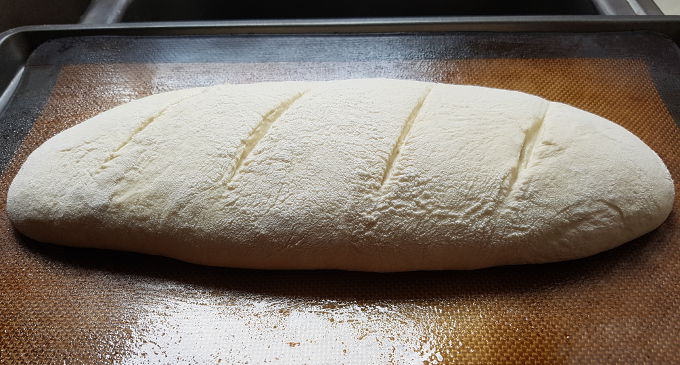
Now, with all that being said, the two hour rise time is over so I’ll grab the sourdough and get it ready to go in the oven. Last time I simply shaped it into a ball and I believe that might have been what contributed to such a long cook time. This time I intend to shape it more or less in the shape of a classic loaf. Hopefully this will provide more surface area, which should lead to a shorter cooking time.
Again, the dough seems like it hasn’t risen much. Altogether, the dough had been left to rise for over 4 hours with two short interruptions for kneading.
I can only hope for the best. I have a feeling when all is said and done, that it will taste a lot like sourdough bread should, but I’m thinking it’s still going to be somewhat dense. We’ll have to wait and see I guess. I’ll be back when it’s done cooking…hopefully.
↓
Intermission
↑

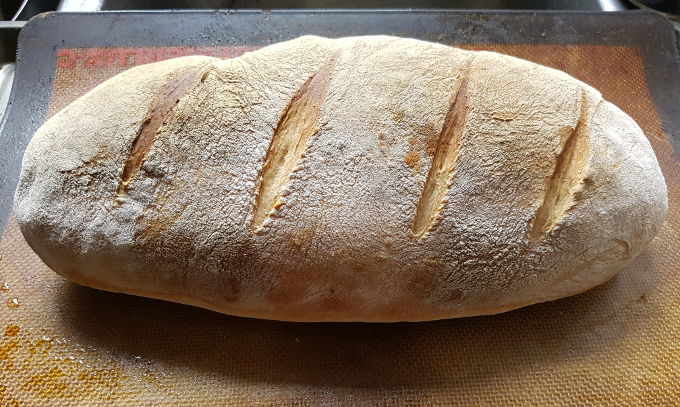
Upon first impression, the sourdough bread looks excellent. Let’s see if it can hold up during a more intense examination. A.K.A. under the knife.
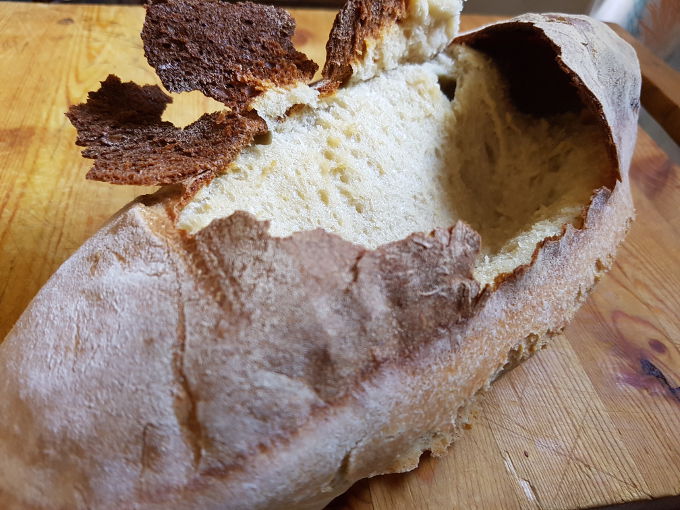
Alright, well the bread has finished cooking and right off the bat I noticed it had risen a substantial amount during the cooking process. I have to say I wasn’t expecting that. So after giving it a quick thump on the top to see if it sounded hollow, I set it aside to cool for a bit. At this point, I was expecting great things. The only thing I could see that might be a problem was the bottom of the bread. It still looked a tad underdone.
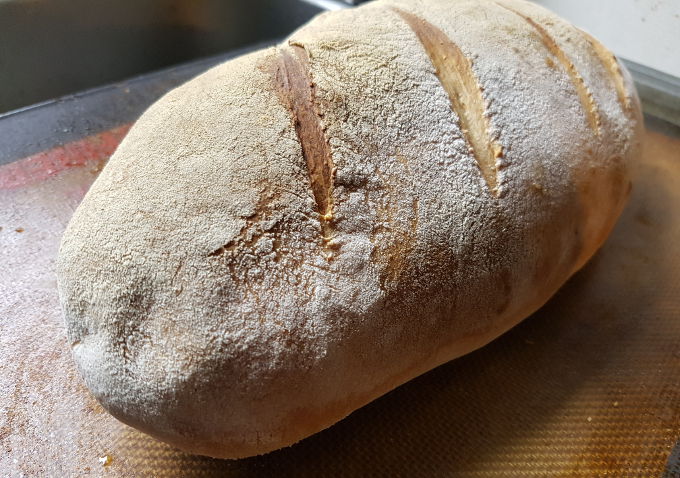
Here comes the bad news as always though. I tapped the top of the loaf again and it actually broke. As in it was nothing more than a thin layer of bread which had expanded due to a huge air bubble that formed while cooking. Disappointing for sure, but I have a hunch on why this might have happened.
I had decided early on that I wasn’t going to knead the sourdough very much after reading an article talking about artisan bread. The idea was simply to not use machines to knead the bread because of the uniformity of air pockets they produce. I wanted larger air pockets, but I’m pretty sure I went overboard on this one. Next time I will be kneading my dough longer. Now I know.
This loaf of sourdough bread managed to fool me quite well. Shame on you sourdough bread for tricking me like that!
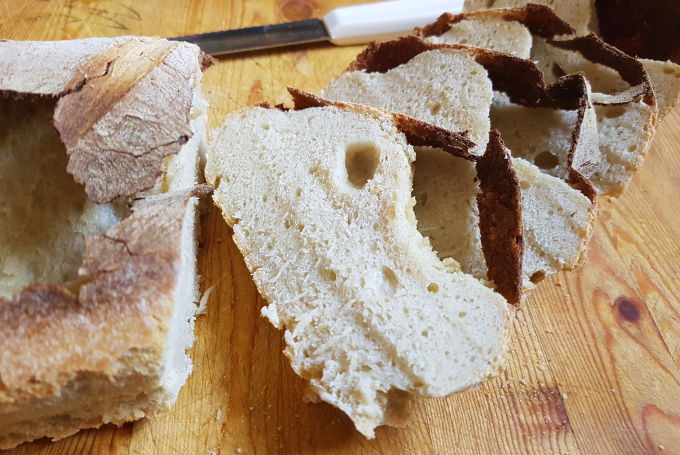
Moving on however, it was still a little denser than I would have liked, but far less dense than my previous attempt. Before I talk about whether or not I hit the mark on flavor, I want to just mention that this time around, I upped the salt amount by a 1/2 teaspoon and I feel that was probably needed.
So how did it score in the sourdough flavor department? Well, I don’t think it could have gotten much better. I might tweak the amount of water and starter next time around, but it actually tasted exactly like what I was hoping for. I don’t know if it has to do with how old the starter is, but this loaf of bread tasted so much more like sourdough than my first try.
Overall, I would say if it weren’t for the big air bubble that had formed, I would be quite happy with this recipe and given myself a nice pat on the back before checking off the, “Learn to bake sourdough bread” section in one of my personal weird rule books.
At least this gives me an excuse to make another post about my adventures in sourdough. Maybe I should rename these posts. Hmm, I’m going to think about that. As always though, let me know what you think about everything in the comment section below and I will talk you all later.
The well done ‘skin’ on top may look a trifle bit overdone, but don’t let that fool you, it tasted really good. I feel I’m getting closer to unlocking the mystery that is sourdough.
Sourdough Bread – Second Attempt
By: Semiserious chefs
Serves: ¯\_(ツ)_/¯ ???
Ingredients:
- 3 cups bread flour (most recipes probably call for all purpose flour)
- 1 1/2 cups sourdough starter
- 1 cup water (I used cold, not sure if it matters)
- 2 teaspoons salt
What I did:
- Mix all four ingredients on low in a mixing machine with a dough hook. This time I mixed the dough for roughly 4 minutes and it seemed about right.
- Remove bowl from mixer and set it on the counter to rise. That’s what’s supposed to happen I think. Cover it with a moist towel to keep it from drying out. Let it sit for an hour.
- Remove dough, and place on a lightly floured counter. Knead the dough for about 30 seconds (looking back, you should knead it for longer). I’m trying a new technique.
- Return kneaded dough to bowl, cover with moist towel and let rise for an additional hour and fifteen minutes.
- Remove dough again, place on a lightly floured counter and knead the dough for another 30 seconds (again, you should knead it for longer) or so.
- Return kneaded dough to bowl, cover with moist towel and let rise for an additional two hours.
- Remove and shape the sourdough into a rough loaf shape and place on appropriate cooking pan. Score the top of the dough with a knife if you want.
- Preheat oven to 375° F (190° C) and bake the sourdough loaf for 50 minutes. If your oven cooks unevenly, you may need to rotate the bread halfway through cooking time.
- Remove loaf from oven and let cool.
- Realize it tastes good but still needs some work.
Post a comment