
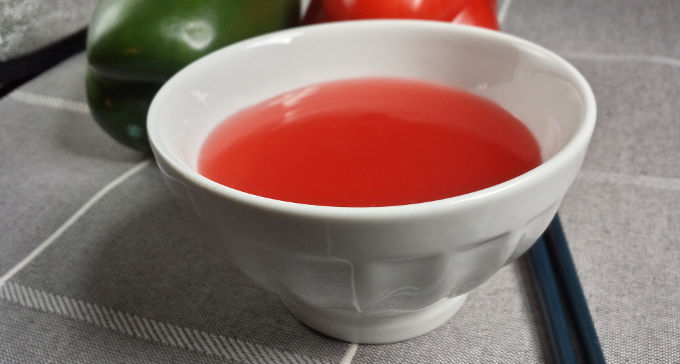
Sweet and sour sauce ready to coat the chicken, but also great for dipping egg rolls in or mixing with fried rice.
If you love Chinese food (I mean American style, not authentic) like I do, then you will probably find this recipe for sweet and sour chicken to be a pretty close match to what you’ll get in many Chinese takeout restaurants here in Alaska. And I assume in the lower 48 (47 if Texas secedes) as well. Hey if that were to happen, Alaska would still be the largest state in the union.
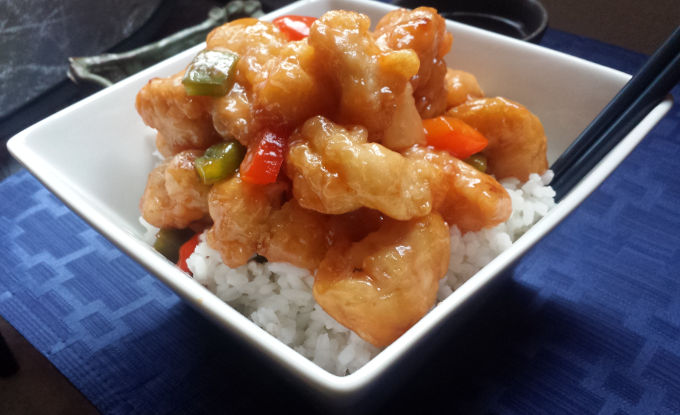
Get ready for this. This recipe calls for red food coloring (optional) to make it look even more like genuine (fake) sweet and sour sauce – just like you get at the restaurants! Are you excited yet!? Okay, Okay, I’m kidding about all that, but you really can put the food coloring in if you want it to look like the picture above. Even though it might not sound like it, I promise this is a real recipe and not just me messing around.
Let me start over. As you probably know, I can’t handle seafood, so a lot of authentic Chinese dishes are off the table for me. What I’m left with is a less healthy alternative when I’m in the mood for some Chinese food. And sweet and sour chicken is one of my favorites, so naturally I wanted to share it with everyone else. Why am I telling you all of this? I actually don’t know.
Let me quickly bring up something I’ve noticed. It’s possible that it could just be me and my persnickety nature, but it sure seems that many of the recipes floating around the internet don’t provide a good method of breading the chicken that’s capable of delivering adequate results. If you care about your breading (and I hope you do), you most definitely know what I mean.
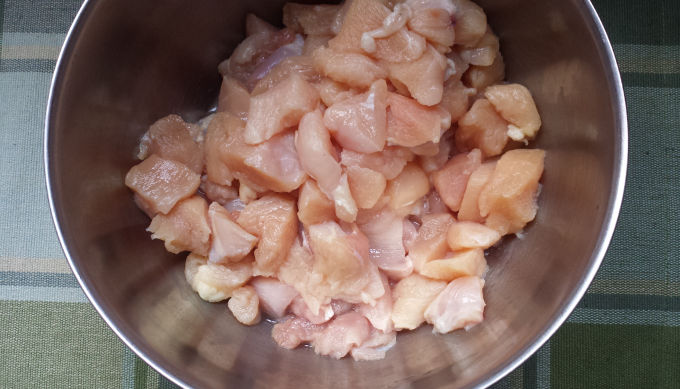
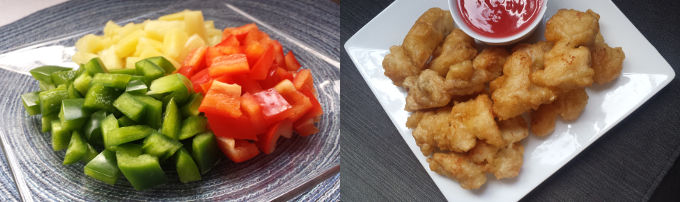
Two pounds of roughly cubed chicken before adding the batter. Make them whatever size you want. Oh, and dark meat will end up being more tender, whereas overcooked breast meat will end up dryer.
Granted, different Chinese recipes call for different types of breading, such as tempura batter which is lighter and works well with vegetables. I get that. But for sweet and sour chicken, I feel it requires something other than simply dredging the chicken in corn starch or flour (or both) before dropping it in hot oil. It needs to have a chewy breading; something with some actual substance that’s able to stand up to the sweet and sour sauce without getting soggy. I feel somewhat strongly on this issue as it pertains not only to sesame chicken but General Tso’s chicken as well. Albeit possibly to a lesser degree.
Believe it or not, (I would be inclined to go with ‘not’ if I were you) I’ve spent a good deal of time experimenting and trying to figure out how the Chinese restaurants get their breading just right. Every so often though, I have to step back and remind myself that there are certain things which simply can’t be replicated in a home kitchen environment. One of them being that a kitchen stove isn’t capable of reaching the required temperatures found in most restaurants. That has nothing to do with breading, it’s just something I think about, and it’s one of the conclusions I’ve come to. Come to think of it, that’s probably why I can’t get my fried rice to come out exactly how I want either.
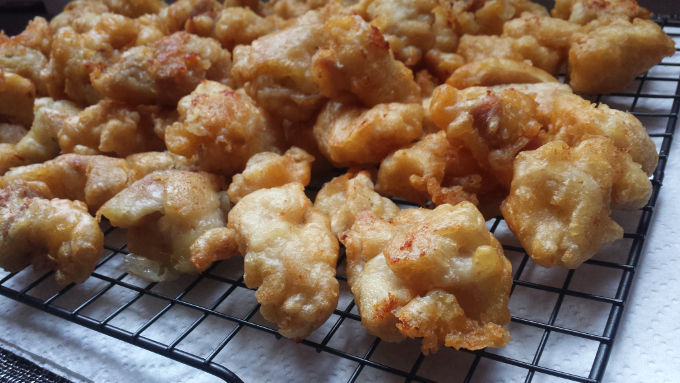
Not to brag but that’s a bunch of beautifully breaded chicken pieces. And don’t tell anyone, but they are delicious all by themselves.
While it might not be how they do it in the actual restaurants, our method is simple and doesn’t create a ton of dirty dishes. Good Chinese food is notorious for taking a long time to make as well as creating a lot of dirty dishes. The key ingredients are baking powder and baking soda. In fact, it’s nothing more than a batter made with water, flour, cornstarch, salt, baking powder, and baking soda. You could add other things, I guess. If you wanted. Maybe sugar…or soy sauce. But I don’t really see the point in that.
Make sure you thoroughly whisk the batter up. There’s science behind that statement I think. I read somewhere that if the ratio of baking powder is too high, it could expand too much and collapse in on itself while it cooks. So it’s best just to keep everything as uniform as possible. I really want to talk more about the batter but I think that’s about it. I think I’ll talk about frying the chicken pieces now.
Here are a couple of random pictures for your viewing pleasure.
I prefer to use a thick skillet (to retain heat well) that’s filled just high enough with oil that it covers half of the chicken pieces. I like to heat the oil somewhere between 325°F – 350°F (165°C – 175°C). Don’t stress about it too much, just try not to let the oil go past 350°F. If the oil is too hot, it will burn the outside, but leave the inside too doughy. Lastly, don’t add too many pieces of chicken at a time. I’m sure everyone reading this knows it, but the oil cools down too much if it gets overcrowded. So stick with smaller batches. It takes longer to cook everything but you get better results.
As for the sweet and sour sauce, the recipe below makes enough sauce to coat all the chicken but that’s about it. I did it this way because I have a bad habit of making far too much sauce and I had to get myself under control. Usually with me it’s just a bunch of pieces of chicken swimming in a sea of sauce, whether it be sweet and sour sauce or sesame chicken sauce. So you might need to double the recipe for the sauce (it will be a lot) if you intend on using it for anything else such as dipping your egg rolls in it.

Sweet and sour chicken
By: Semiserious Chefs
Serves: 4-6
Ingredients:
Chicken and batter:
- 2 lbs. cubed chicken (about 2 large breasts)
- 1 cup water
- 3/4 cup flour
- 1/2 cup cornstarch
- 1 teaspoon baking powder
- 1 teaspoon baking soda
- 1/2 teaspoon salt
Sweet and sour sauce:
- 3/4 cup red bell pepper (chopped)
- 3/4 cup green bell pepper (chopped)
- 1/2 cup pineapple tidbits
- 1 tablespoon vegetable oil
- 1 cup water
- 1/2 cup sugar
- 1/4 cup rice vinegar (more or less to taste)
- 1/4 cup pineapple juice
- 2 tablespoons cornstarch
- 2-3 drops red food coloring (optional)
Directions:
- In a large bowl combine water, flour, cornstarch, baking powder, baking soda and salt. Whisk this mixture well.
- Cube chicken to whatever size you like. It could be strips or whatever you want, it doesn’t really matter. When finished cubing the chicken, add them to the bowl containing the batter you whisked together just prior and set the whole thing aside.
- Fill a large skillet with enough oil to cover half the height of the chicken pieces. Heat over medium heat until oil reaches a temperature of 325°F – 350°F (165°C – 175°C). Don’t exceed 350°F.
- Using a set of tongs, remove batter covered chicken from the bowl a few at a time, and carefully add to the hot oil. Don’t overload the skillet.
- Cook the chicken for 4-5 minutes per side, for a total cook time of roughly 8-10 minutes per batch. Pay attention to your oil though, if it’s too hot your batter will darken too much if you stick with the cooking times I recommend here.
- Remove chicken from oil and let cool on a wire rack or some paper towels. Repeat this process until all the chicken is done this way. The pieces should be nice and puffy at this point.
- In a medium bowl combine all of the ingredients listed under the sweet and sour sauce section above except for the colored peppers, vegetable oil, and pineapple. Make sure this mixture gets thoroughly whisked because it’s going to go directly into a hot pan. It’s important that the cornstarch gets adequately incorporated so no lumps form while it cooks.
- Now grab a large saucepan, heat the tablespoon of vegetable oil over medium-high heat and add the red and green bell peppers. Sauté for 2-3 minutes. Turn heat down to medium, add the pineapple and the sauce that was just mixed.
- After a few minutes it will start to thicken. Make sure to stir the sauce often though.
- At this point, the bell peppers will still be kind of crunchy so turn the heat down until sauce is just able to maintain a slow simmer and cook until the peppers reach desired consistency.
- Lastly, drop the breaded chicken into sauce and stir to coat chicken.
- That’s it. Enjoy!
Post a comment